Leman Russ: Painting Strategy
Peter D asked a great question in the comments on the last post. It’s such a good question, it deserves it’s own blog post. I didn’t want to hide the answer among the comments.
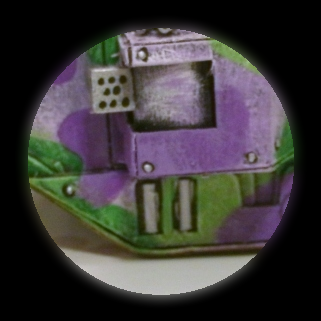
The acrylic paints that you get for a buck or two at the local craft store are cheap and come in a wide variety of colors, but a lot of them aren’t thick enough to show up against a black background. The lighter shades really need to be applied to a white background to get the full effect. Without the white drybrushing, the light greens and purples won’t show up.
The white drybrush coat also gives you more texture for less work. When you block paint a color onto the white ares, the places where the white isn’t as thick give you colors that are muted. This means more shading in the figure’s colors. You can even control the amount of shading by controlling how thick you apply the dry brush. A dark figure gets a thinner coat of white, and the same color will wind up darker. You’ll see exactly what I mean when I post the fully painted tank. In the meantime, here’s a sneak peek:
This technique works for pretty most figures. I haven’t been using it on the 10mm figures, as the ink wash does the same job with less hassle on the smaller figures. You can use both techniques on bigger figures, though, and you get even more depth in your miniature. Maybe one of these days I’ll post a step-by-step of my technique on a 28mm figure to show what I’m talking about. Thanks for the inspiration, Peter D.
Thanks for the answer.
I have the same issue with my paints, craft (Apple Barrel Colors or the so-so Anita's) or mini paints (Reaper Pro Paints, Vallejo, even my old Ral Partha Colors) or "better" paints (Liquitex). Primer with black and the light stuff doesn't work so well, but primer light and you're consigning yourself to covering most of a dark mini black anyway.
I never thought of white-brushing to get that. I tend to black primer minis that are primarily dark, then paint a base coat or two of a darker but similar shade on top as a prep coat. Say for these minis I'm painting now – they are black-primered and then spray-painted black since they are just going to be gloss black at the end. But they have equipment that needed to be brown and light blue. So I base-coated dark brown and grey on them, respectively, before putting on brown and light blue. It seems to work, but I don't get that streaking effect you've highlighted.
I'll give that a try. Thanks for the very complete answer.
What's especially nice about this post is that it describes a technique that is not only effective looking, it's also fast and easy. Most of the painting tutorials that I've found which claim to be simple are generally anything but that ("Learn to speed paint skeletons in only fifty simple steps!") so this is a refreshing change.
I'm going to give this method a try the next time I paint a light colored large scale model.